Monday, November 25, 2024

Migrating and Preserving ModifiedOn, ModifiedBy values of Dynamics 365/CRM

Out of the box there's no solution to keep the original source values of ModifiedOn and ModifiedBy when migrating data records to Dynamics 365. In an on-premises deployment you could accomplish the task by the unsupported query update on the destination database; but if you are migrating to cloud Dynamics 365 database access is not an option. In this article I'll walk you through step-by-step guide of one solution proven to work in migration projects. The migration scenario is to move data from an older Dynamics CRM system to online Dynamics 365/CRM; but this could work for other data sources wishing to migrate to Dynamics 365/CRM.

The steps are:
1. Create temporary fields in destination entity to hold the source values of ModifiedOn and ModifiedBy.
2. Write plug-in to set ModifiedOn/By values of destination entity.
3. Register the plug-in.
4. Map source fields to temporary fields and run the migration/import

Step 1: Create 2 temp fields new_ModifiedOn and new_ModifiedBy in the destination environment. Whatever method/tool of migration you will use, the source ModifiedOn will set value for destination new_ModifiedOn; and source ModifiedBy will set value for destination new_ModifiedBy.

Step 2: Write plug-in to set value of destination ModifiedOn and ModifiedBy. Core code for the plug-in is at the end.

Step 3: Register the plug-in, on create message and Pre-Operation.

Step 4: Map the fields for migration/import, like I mentioned in Step 1 - source ModifiedOn to destination new_ModifiedOn, and ModifiedBy to new_ModifiedBy

Now if you run the migration/import, the plug-in will pickup the original values in temp fields and set them for ModifiedOn/ModifiedBy upon creation of new record.

Here is my plugin:

using System;
using Microsoft.Xrm.Sdk;
using Microsoft.Xrm.Sdk.Query;

namespace TXN.Plugin.PreserveRecordInfo
{
    public class PreCreateRecord : IPlugin
    {
        #region Secure/Unsecure Configuration Setup
        private string _secureConfig = null;
        private string _unsecureConfig = null;

        public PreCreateRecord(string unsecureConfig, string secureConfig)
        {
            _secureConfig = secureConfig;
            _unsecureConfig = unsecureConfig;
        }
        #endregion
        public void Execute(IServiceProvider serviceProvider)
        {
            ITracingService tracer = (ITracingService)serviceProvider.GetService(typeof(ITracingService));
            IPluginExecutionContext context = (IPluginExecutionContext)serviceProvider.GetService(typeof(IPluginExecutionContext));
            IOrganizationServiceFactory factory = (IOrganizationServiceFactory)serviceProvider.GetService(typeof(IOrganizationServiceFactory));
            IOrganizationService service = factory.CreateOrganizationService(context.UserId);

            if (context == null) throw new InvalidPluginExecutionException("IPluginExecutionContext is null");
            if (service == null) throw new InvalidPluginExecutionException("IOrganizationService is null");
            if (tracer == null) throw new InvalidPluginExecutionException("ITracingService is null");

            tracer.Trace("TXN: message: " + context.MessageName + " | Timestamp: " + DateTime.Now);
            
            if (context.InputParameters.Contains("Target") && context.InputParameters["Target"] is Entity)
            {
                Entity entity = (Entity)context.InputParameters["Target"];

                string _message = context.MessageName.ToUpper();
                string _entityLogical = entity.LogicalName;

                tracer.Trace("TXN: entity: " + entity.LogicalName + " | GUID: " + entity.Id.ToString());
                //TXN: Filter the message and your entities here
                if (!(_message == "CREATE" ) ||
                    !(_entityLogical == "knowledgearticle" || 
                      _entityLogical == "adobe_agreement" ||
                      _entityLogical == "phonecall" ||
                      _entityLogical == "fax" ||
                      _entityLogical == "letter" ||
                      _entityLogical == "appointment" ||
                      _entityLogical == "email" ||
                      _entityLogical == "task"))
                    return;

                try
                {
                    DateTime _initDate = new DateTime(2099, 12, 12);
                    DateTime _modifiedOn = _initDate;
                    string _modifiedBy = null;

                    if (entity.Contains("new_modifiedon") && entity.Attributes["new_modifiedon"] != null)
                    {
                        _modifiedOn = (DateTime)entity.Attributes["new_modifiedon"];
                        tracer.Trace("TXN: mapped new_modifiedon: " + _modifiedOn.ToString());
                    }

                    if (entity.Contains("new_modifiedbyname") && entity.Attributes["new_modifiedbyname"] != null)
                    {
                        _modifiedBy = (entity.Attributes["new_modifiedbyname"]).ToString();
                        tracer.Trace("TXN: mapped new_modifiedbyname: " + _modifiedBy);
                    }

                    //TXN: Set original modifiedon value in destination record
                    if(!_modifiedOn.Equals(_initDate))
                    {
                        entity.Attributes["modifiedon"] = _modifiedOn;
                        tracer.Trace("TXN: set modifiedon to: " + _modifiedOn.ToString());
                    }

                    //TXN: find new_modifiedbyname and set that user to destination record's modifiedby
                    if (_modifiedBy != null)
                    {
                        var fetchXml = @"<fetch version='1.0' output-format='xml-platform' mapping='logical' distinct='false'>
                              <entity name='systemuser'>
                                <attribute name='fullname' />
                                <attribute name='systemuserid' />
                                <filter type='and'>
                                  <condition attribute='fullname' operator='eq' value='{0}' />
                                </filter>
                              </entity>
                            </fetch>";
                        fetchXml = string.Format(fetchXml, _modifiedBy);
                        EntityCollection users = service.RetrieveMultiple(new FetchExpression(fetchXml));
                        if (users != null && users.Entities.Count > 0)
                        {
                            entity.Attributes["modifiedby"] = users.Entities[0].ToEntityReference();
                            tracer.Trace("TXN: set modifiedby to user: " + users.Entities[0].GetAttributeValue<string>("fullname"));
                        }
                    }
                }
                catch (Exception e)
                {
                    throw new InvalidPluginExecutionException(e.Message);
                }
            }
        }
    }
}

Friday, November 22, 2024

How to list shared Dynamics records and user access levels with Power BI

We all know about the POA table (principalobjectaccess) that holds information about what records are being shared, to what users/teams, and at what access levels. Here I will show how to report such information with Power BI.

First, a recap of important POA table columns:

  • objectid: GUID of the record being shared
  • objecttypecode: logical name of the record being shared
  • principalid: GUID of the user/team/organization the record is shared with
  • principaltypecode: has value of systemuser, team, or organization, depends on above principalid
  • accessrightsmask: mask value representing level of access rights to the shared record. 

Let's focus on a concrete use case for this report: I want to see a list of shared Cases, along with the users being shared, and what access level is being granted. The end result would look like this:

Step 1: Launch Power BI Desktop. At the time of this writing Power BI online does not support Dataverse or CDS, the 2 data sources we need for this task. Create a blank report.

Step 2: Get data for 3 tables systemuser, incident, and principalobjectaccessset. The first 2 tables you will get data from Power Platform | Dataverse. The last table POA you will have to get it from Common Data Service (Legacy) source

Step 3: Establish relationships between tables. Switch to Model view. 

Create Many-to-one relationship from principleobjectaccessset/objectid to incident/Case(incidentid).

Create second Many-to-one relationship from principleobjectaccessset/principalid to systemuser/User(systemuserid)


Step 4: Create the report. Switch to Report view and choose the columns from Data tab for the report. On Filters tab, filter column objecttypecode to incident, filter column principaltypecode to systemuser

Now you have the report. My sample includes 2 Case records being shared with few users with different access levels (1 - read; 3 - read, write; 7 - read, write, append)


Wednesday, December 6, 2017

How to Create Disabled Users in Dynamics 365/CRM

This article discusses 2 possible options for creating inactive/disabled users within Dynamics 365/CRM. This type of users consume no license, and need not be associated with Active Directory, or Microsoft/Office 365 account, for authentication; and you would want to have them in your Dynamics CRM to, for example, hold data records migrated from another system.

Option #1 - Writing code.

At the minimum you have to set the following required attributes for a new disabled user:

       Entity _disabledUser = new Entity("systemuser");

       _disabledUser["firstname"] = "John";
       _disabledUser["lastname"] = "Smith";
       _disabledUser["issyncwithdirectory"] = false;
       _disabledUser["isdisabled"] = true;
       _disabledUser["internalemailaddress"] = "john.smith@fakemail.com";
       _disabledUser["businessunitid"] = new EntityReference("businessunit", new Guid("7AFD896E-B3AD-E711-A967-000D3A192828"));
       _disabledUser["domainname"] = "john.smith@fakedomain.com";

       _service.Create(_disabledUser);

Note that the phantom domainname (User Name) must be unique and not to duplicate with any other existing enabled or disabled users. The internalemailaddress is allowed to be duplicated value when I run the above code.

This option requires making program, and could be quick to generate a few users. But when the legacy users run in the hundreds, a better option is to use a software utility to read the legacy user list and generate them on the destination Dynamics system, with just a push of a button. And no coding needed. I'm talking about option 2 next.

Option #2 - Integration software.

If you've done some Dynamics data migration and integration, you might hear of Kingswaysoft SSIS Integration Toolkit for Microsoft Dynamics 365. The toolkit comes with components that allow you to connect to the source and destination Dynamics CRM sites to read and write data records. Of course all the standard ETL components are available for your SSIS data transformation project. The Toolkit is free if you don't want to deploy to run automatically on schedule, which is fine here since producing disabled users is not something to do daily.

Here's the snapshot of the data flow:


The Derived Columns component contains constant values for issyncwithdirectory, isdisabled, and businessunitid that will be used in the destination component for every disabled user record:


The rest of required user data will come from the source. So the destination field mappings will look like this:


Here I'm calling the Upsert action on the systemuser entity. Create action would be more optimal.


Hope this helps with your Dynamics 365/CRM migration project. I'm sure there are other options. The SSIS Integration Toolkit from Kingswaysoft really helps jump start my project with so many legacy users in the old CRM system.

Tuesday, October 24, 2017

Adding Mixture of Unit Testing Frameworks to Dynamics 365/CRM Plug-in Project

Introduction:

Fake Xrm Easy is a very useful, and considerably easy, open source framework to unit test your Dynamics 365/CRM plug-ins. You might already know about the other authentic, and not so "easy", unit testing framework Fakes introduced by Microsoft.

There are occasions when it is necessary, or sometimes more convenient, to use both frameworks in one unit testing project. In this post I will demo such a mixture in a simple plug-in project. I will also walk through steps of adding unit test project to an existing Visual Studio plug-in solution as a beginner guide to jump start a unit test initiative for your Dynamics 365/CRM plug-in.

The Plug-In:

My demo plug-in is a pre-operation, registered on the creation of a Note. When a new Note is created, creation date and user full name will append to the end of the Note's title.

For example, entering title "Demo Unit Test" will save new Note title as "Demo Unit Test: Note created on 12/31/2020 03:09:15 PM by Tuan Nguyen". You might recall this is the default behavior in Dynamics CRM 2011 without the need of a custom plug-in. If no title is entered, new Note will have title "Title: Note created on 12/31/2020 03:15:15 PM by Tuan Nguyen".

Here's the simplified version of the plug-in code in a VS project called TXN.Plugin.Annotation :

using System;
using System.Linq;
using Microsoft.Xrm.Sdk;
using Microsoft.Xrm.Sdk.Query;

namespace TXN.Plugin.Annotation

{
    public class PreCreate: IPlugin
    {
        public void Execute(IServiceProvider serviceProvider)
        {
            IPluginExecutionContext context = (IPluginExecutionContext)serviceProvider.GetService(typeof(IPluginExecutionContext));
            IOrganizationService service = ((IOrganizationServiceFactory)serviceProvider.GetService(typeof(IOrganizationServiceFactory))).CreateOrganizationService(new Guid?(context.UserId));

            if (context.InputParameters.Contains("Target") && (context.InputParameters["Target"] is Entity))

            {
                Entity entity = context.InputParameters["Target"] as Entity;

                if (entity.LogicalName == "annotation" && context.MessageName.ToUpper() == "CREATE")

                {
                    string title = "Title";
                    string fullName = string.Empty;

                    if (!string.IsNullOrEmpty(entity.GetAttributeValue<string>("subject")))

                        title = entity.GetAttributeValue<string>("subject");                          
                            
                    var fetchXml = @"<fetch version='1.0' output-format='xml-platform' mapping='logical' distinct='false'>
                                     <entity name='systemuser'>
                                        <attribute name='fullname' />
                                        <attribute name='systemuserid' />
                                        <filter type='and'>
                                            <condition attribute='systemuserid' operator='eq' uitype='systemuser' value='{0}' />
                                        </filter>
                                    </entity>
                                    </fetch>";

                    fetchXml = string.Format(fetchXml, context.UserId.ToString());

                            
                    EntityCollection users = service.RetrieveMultiple(new FetchExpression(fetchXml));

                    if (users != null && users.Entities.Count() > 0)

                        fullName = users.Entities[0].GetAttributeValue<string>("fullname");
                            
                    title = string.Format("{0}: Note created on {1} by {2}", title, PluginDateTime.getDateTimeNow(), fullName);
                    entity.Attributes["subject"] = title;                                
                }
            }
        }
    }

    public static class PluginDateTime

    {
        public static string getDateTimeNow()
        {
            return string.Format("{0:M/d/yyyy hh:mm:ss tt}", DateTime.Now);
        }
    }

}


Add Unit Test Project:

First we need to provision an empty place holder unit test project in the solution before adding MS Fakes and FakeXrmEasy unit testing methods to it later:

1. Add a new project to Visual Studio solution containing the above plug-in project, using the Unit Test Project template installed with Visual Studio. Here I add the unit test project called TXN.Plugin.UnitTest:


2. At this point the default unit test project can be compiled and run without problem as it isn't really testing anything yet:


Unit Testing with Fakes Framework:

We want to unit test the static method in the plug-in, getDataTimeNow(), which makes a system call DateTime.Now. And the proper approach is to use Shims type of MS Fakes Framework to simulate the date time return value.

First thing is to have references to the plug-in project so we can make calls to plug-in methods in unit testing class. Right click on References node in UnitTest project to Add Reference; and select the plug-in project:


The plug-in assembly TXN.Plugin.Annotation should now be visible in the References list of UnitTest project.

Next we add the Fakes assembly to References list. Since Datetime class is in System.dll, right click on System under References and select Add Fakes Assembly. A few system fakes assemblies along with a Fakes folder will be automatically created.

Now add code to TestMethod1() to unit test static method getDateTimeNow():


Mix in FakeXrmEasy Unit Testing:

At this point we have unit tested the static method resides in the same plug-in assembly using Fakes framework. But we have not tested the plug-in at all. We will install the FakeXrmEasy framework to the same UnitTest project before programming the plug-in tests. The true beauty of FakeXrmEasy is that you can fake everything, well almost everything, to come up with a unit test case, without the need to deploy the plug-in. And coding is much shorter and more readable compared to other frameworks. I guess that's why they call it Easy. I think the name makes sense.

To install FakeXrmEasy assemblies, right click on References node from UnitTest project, and select Manage Nuget Packages. Enter 'FakeXrmEasy' to search for the online package. Choose the FakeXrmEasy version compatibled to your compiled plug-in and hit Install:


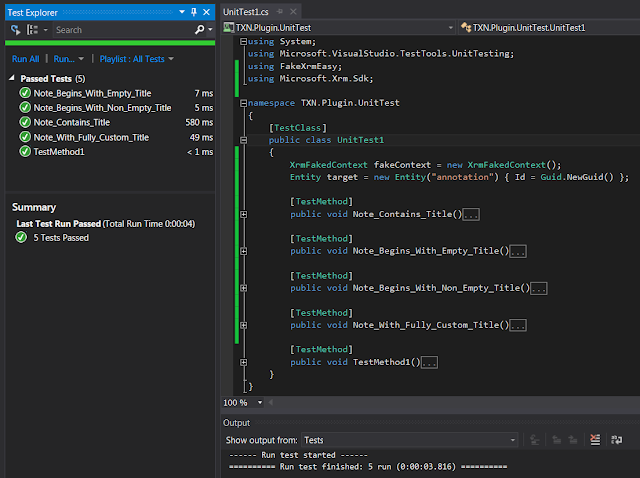
When installation completes the whole new set of assemblies will be added to the project and we are now ready to write unit test functions against the plug-in. And then run the unit tests:


The code is presented at the end of the post and I won't go over the details of it. Some test methods are redundant in the example here for the purpose of a demo.

However I do want to point out that in one of the test methods, Note_With_Fully_Custom_Title(), we have mixed both unit testing frameworks MS Fakes and FakeXrmEasy to achieve the effect of simulating a system-dependent value within the plug-in operation.

I hope you have fun in unit testing discipline with your Dynamics 365/CRM plug-ins.

using System;
using Microsoft.VisualStudio.TestTools.UnitTesting;
using FakeXrmEasy;
using Microsoft.Xrm.Sdk;

namespace TXN.Plugin.UnitTest
{
    [TestClass]
    public class UnitTest1
    {
        XrmFakedContext fakeContext = new XrmFakedContext();
        Entity target = new Entity("annotation") { Id = Guid.NewGuid() };

        [TestMethod]
        public void Note_Contains_Title()
        {
            var fakedPlugin = fakeContext.ExecutePluginWithTarget<TXN.Plugin.Annotation.PreCreate>(target);

            Assert.IsTrue(target.Attributes.ContainsKey("subject"));
        }

        [TestMethod]
        public void Note_Begins_With_Empty_Title()
        {
            var fakedPlugin = fakeContext.ExecutePluginWithTarget<TXN.Plugin.Annotation.PreCreate>(target);
            string title = target.Attributes["subject"].ToString();

            Assert.IsTrue(title.StartsWith("Title: Note created on"));
        }

        [TestMethod]
        public void Note_Begins_With_Non_Empty_Title()
        {
            target.Attributes["subject"] = "My Note Title";
            var fakedPlugin = fakeContext.ExecutePluginWithTarget<TXN.Plugin.Annotation.PreCreate>(target);

            Assert.IsTrue(target.Attributes["subject"].ToString().StartsWith("My Note Title: Note created on"));
        }

        [TestMethod]
        public void Note_With_Fully_Custom_Title()
        {
            Guid callerId = Guid.NewGuid();
            fakeContext.CallerId = new EntityReference("systemuser", callerId);

            Entity user = new Entity("systemuser");
            user.Id = callerId;
            user["fullname"] = "Tuan Awesome Nguyen";

            fakeContext.GetFakedOrganizationService().Create(user);

            target.Attributes["subject"] = "Test Note Title";

            using (Microsoft.QualityTools.Testing.Fakes.ShimsContext.Create())
            {
                System.Fakes.ShimDateTime.NowGet = () =>
                {
                    return new DateTime(2025, 10, 10, 11, 12, 13);
                };

                var fakedPlugin = fakeContext.ExecutePluginWithTarget<TXN.Plugin.Annotation.PreCreate>(target);

                Assert.IsTrue(target.Attributes["subject"].ToString().Equals("Test Note Title: Note created on 10/10/2025 11:12:13 AM by Tuan Awesome Nguyen"));
            }
        }

        [TestMethod]
        public void TestMethod1()
        {
            using (Microsoft.QualityTools.Testing.Fakes.ShimsContext.Create())
            {
                System.Fakes.ShimDateTime.NowGet = () =>
                {
                    return new DateTime(2020, 10, 10, 11, 12, 13);
                };

                var componentUnderTest = TXN.Plugin.Annotation.PluginDateTime.getDateTimeNow();

                Assert.IsTrue(componentUnderTest.ToString().Equals("10/10/2020 11:12:13 AM"));
            }
        }
    }
}


Tuesday, December 16, 2014

Filter UserIdHash to report user activities with IIS Logs in Dynamics CRM IFD

If you are administrating Dynamics CRM on-premises and one day need to report certain CRM activities of a particular user, e.g. Advanced Find or Export activities, you will immediately, or eventually - if it is first time under the assignment, start digging into IIS Logs because you know Auditing feature, if it's ever been turned on,  won't provide that kind of information.

The challenge is that with Internet Facing Deployment (IFD), user authentication is performed in ADFS server, not in IIS server. Therefore IIS Log entries won't have User Name (corresponding to cs-username field for W3C log format) info available for you to filter out the activities of a target user.

What about IP address? Yes, IIS Log entries will include Client IP Address (W3C logging field c-ip) of client machines making CRM requests. But with IFD setup users can log in to CRM from any location; each with a different IP. And even if you know they only do CRM from a specific workstation in office, a specific IP address won't guarantee to stick with one user if corporate network domain is running DHCP configuration.

So how to filter Dynamics CRM interactions belonging to a particular user when IIS Log entries don't include User Name, and logged IP address won't persist over time for one user? I couldn't find the answer online searching around for awhile. But then I started staring at the log files quite longer period and figure out the steps to work out the solution.

If you look at each log entry like one below (again I'm referencing W3C log):

#Fields: date time cs-method cs-uri-stem cs-uri-query c-ip cs(User-Agent) sc-status sc-bytes cs-bytes time-taken
2014-12-08 21:26:00 GET /Reserved.ReportViewerWebControl.axd OpType=Resource&Version=10.0.30319.1&Name=Microsoft.ReportingServices.Rendering.HtmlRenderer.RendererResources.unsorted.gif+OnBeginRequest:12/08/2014-21:26:01.311+UserIdHash:1488234363+LogEntries:0+SqlCalls:0+SqlCallsMs:0+GC:90+OnEndRequest:21:26:01.311 192.168.123.45 Mozilla/5.0+(compatible;+MSIE+10.0;+Windows+NT+6.1;+WOW64;+Trident/6.0) 200 373 3409 218

You notice that the URI Query field (cs-uri-query) in each log entry embeds with it a bunch of information related to the web request from user client. The key piece of info valuable for the reporting purpose is UserIdHash, in this example the digit sequence 1488234363

After running several tests and comparing logs under few user accounts, it turns out that the digit sequence after UserIdHash stay the same unique number for all requests originated from a particular user. For example, the number above, 1488234363, is associated with my own CRM user account and is embedded within URI Query field for each activity logged in IIS. All I need to do is running certain kind of log parser tool to filter all the entries that contain the string UserIdHash:1488234363 and voila... there I have a filtered log of my own activities in CRM.

That's not so bad of a solution, isn't it. I'm able to figure out the UserIdHash value associated with my CRM user account by doing a few CRM actions, noting the time of these actions and the local IP of my workstation. Then go back to the IIS Logs and review new log entries associated with the same IP in Client IP Address (c-ip) that have the same time stamps with my CRM actions.

How would you find out the UserIdHash that map to another user? By doing similar tracing mechanism mentioned above, except this time you could be able to obtain info of his/her client machine IP address that exists at an approximate time frame, but not the exact timing of the CRM actions. One way to obtain client IP is by viewing header of an email the user sends you. For example, in Outlook, open the email and click on File, Info, then Properties. The Internet headers would show the IP of the workstation from which user sends email, and most likely uses to launch CRM:


You don't want to rely on just one client IP to trace back UserIdHash unless you know for sure user access CRM from that client machine at certain time period. I would say 3 separate IP's from 3 different days would be safe bet for the correct UserIdHash mapping.

Last but not least, once done with mapping a unique UserIdHash to a user, time to run a log parser tool to extract all the log entries related to that user for further processing. Did I say Log Parser? Here's the query I run from Log Parser to extract all IIS Log entries that reference to my own CRM activities, and output to a CSV file:

C:\Program Files (x86)\Log Parser 2.2>Logparser -o:CSV "Select date as Date, time as Time, cs-method as Method, cs-uri-stem as URI, cs-uri-query as Query, sc-status as Status, sc-bytes as BytesIn, cs-bytes as BytesOut, time-taken as TimeTaken Into Z:\MyCRMLog.csv From C:\inetpub\logs\LogFiles\W3SVC1\*.log Where cs-uri-query like '%UserIdHash:1488234363%'"

If I'm only interested in Advanced Find or Export activities, I can query the following:

C:\Program Files (x86)\Log Parser 2.2>Logparser -o:CSV "Select date as Date, time as Time, cs-method as Method, cs-uri-stem as URI, cs-uri-query as Query, sc-status as Status, sc-bytes as BytesIn, cs-bytes as BytesOut, time-taken as TimeTaken Into Z:\FilteredCRMLog.csv From C:\inetpub\logs\LogFiles\W3SVC1\*.log Where cs-uri-query like '%UserIdHash:1488234363%' AND cs-uri-stem IN '/_grid/print/print_data.aspx'; '/_grid/print/export_dlg.aspx'; '/AdvancedFind/fetchData.aspx')"

So there it is. No User Name in IIS Logs, no problem. Just figure out the embedded UserIdHash value that belongs to a user, by tracing the possible IP's from user's machine that appear in log entries. Then you can parse log files to extract log entries that contain the value of UserIdHash in URI Query log field.